


Generate files automatically with PLOP.Js and handlebars
React / Vue components, controllers and models on back-end, doesn't matter, you can use it anywhere!


What the heck Plop.js is? 🤔
Plop is a generator framework, capable to let you and your team generate any kind of file easy and fast via terminal.
Handlebars?
Handlebars is a simple template language (file.hbs) that generate text format files based on an input object with some “parameters”, but in this case, instead we use an object input, we are going to pass the parameters directly on the terminal.
Introduction
The techniques that you’r going to learn here can be applied in any kind of file, so, doesn’t matter if you want to code components on react, vue, controllers on angular.js or in other hand writing database consults, controllers, the process going to be pretty much the same!
Here, i’m going to use 2 examples, on the front-end creating a complex React Component and the other example on the back-end, building Controller and Modelof the model passed. ps: feel free to use any kind of file extension you want, in this article i’m going to use "ts / tsx" and "js", but you can use it to other languages.
Let’s start installing plop.js on the project
npm install --save-dev plop
After that, We create a dir “generators” which going to be located the template files and plopfile.js
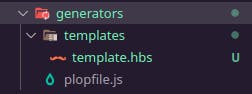
First, let's start with plopfile.js
export default function (plop) {

*// create your generators here*

plop.setGenerator('basics', {
        description: 'this is a skeleton plopfile',
        prompts: [], // array of inquirer prompts*
        actions: [] // array of actions*

});
};
// "prompts" is the array where you declare the questions / input that
// going to be showed on the terminal, example:
prompts: [{
type: 'input',
name: 'name',
message: 'component name please'
}],

// Actions is where we can declare files where going to be created over
// the prompt inputs, example bellow:
actions: [{
type: 'add',
path: 'src/{{name}}.js',
templateFile: 'templates/component.js.hbs'
}]
Basics
First, in this basic demonstration i'm going to create a simple 'Button' component with only one file.
Let's add the component name input on prompts section:
module.exports = function (plop) {

    // controller generator

    plop.setGenerator('component', {
        description: 'application controller logic',
        prompts: [
            {
            type: 'input',
            name: 'name',
            message: 'component name please'
            }
        ],
        actions: []
    });
};
Now we need to create the templates with “file_name.{extension}.hbs” (example: “style.ts.hbs”) before declare the actions on plopfile.
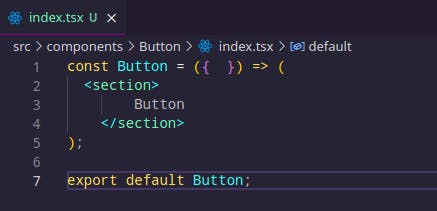
As a very simple example, we got here a index file of the component. (index.tsx.hbs)
const {{pascalCase name}} = ({  }) => (
  <section>
        {{pascalCase name}}
    </section>
);

export default {{pascalCase name}};
Note that inside the brackets are written “pascalCase name”, “name” is referring to the text inputted on the prompt which the key “name” have the value “name” too. ({ type: 'input', name: 'name', message: 'component name please' }) . pascalCase are indicating the text format, you can replace with an other format that you like, snakeCase for example, feel free to change it as you prefer.
const {{snakeCase name}} = ({  }) => (
  <section>
        {{snakeCase name}}
    </section>
);

export default {{snakeCase name}};
Possible cases:
- camelCase: changeFormatToThis
- snakeCase: change_format_to_this
- dashCase/kebabCase: change-format-to-this
- dotCase: change.format.to.this
- pathCase: change/format/to/this
- properCase/pascalCase: ChangeFormatToThis
- lowerCase: change format to this
- sentenceCase: Change format to this,
- constantCase: CHANGE_FORMAT_TO_THIS
- titleCase: Change Format To This
After you write the template, it’s time to insert a new action on the plopfile to use this template file.
actions: [
      {
        type: 'add',
        path: '../src/components/{{pascalCase name}}/index.tsx',
        templateFile: 'templates/index.tsx.hbs'
      }
/*
       Where
        {
            type: The action that you want to execute over the file on the path
            path: Where you want to let your file.
            templateFile: The template that you’ve created.
       }
*/
]
Now, we just need to add a script and run!! On package.json add a “template” script.
"scripts": {
    "template": "npx plop --plopfile ./generators/plopfile.js"
  }
Time to run the script by
npm run template
After you run, you will came across with the questions that you created on plopfile. Here i’m going to create a ‘Button’ component, so:
> npx plop --plopfile ./generators/plopfile.js
? component name please Button
And BOOOM!! The component has been created on the path that you declared at plopfile. In my case, the path is : “../src/components/{{pascalCase name}}/index.tsx”
Now that we know the basics, we can create anything we want. Here is two example scenarios that could help us.
Scenario 1: Front End - React Components
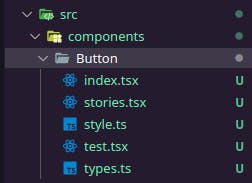
Now, it’s time to think inside our respective scenario, i’m going to try first on the front end scenario. Let’s imagine that we are building components. Every time that we need a new component, we do the same thing everytime, creating index, style, test, types and storybook files. With plop js you are able to do this whole thing in 5 seconds.
Let’s create a complete component!
Plop file:
module.exports = function (plop) {
  // controller generator
  plop.setGenerator('component', {
    description: 'application controller logic',
    prompts: [
      {
        type: 'input',
        name: 'name',
        message: 'component name please'
      }
    ],
    actions: [
      {
        type: 'add',
        path: '../src/components/{{pascalCase name}}/index.tsx',
        templateFile: 'templates/index.tsx.hbs'
      },
      {
        type: 'add',
        path: '../src/components/{{pascalCase name}}/style.ts',
        templateFile: 'templates/style.ts.hbs'
      },
      {
        type: 'add',
        path: '../src/components/{{pascalCase name}}/stories.tsx',
        templateFile: 'templates/stories.tsx.hbs'
      },
      {
        type: 'add',
        path: '../src/components/{{pascalCase name}}/test.tsx',
        templateFile: 'templates/test.tsx.hbs'
      },
      {
        type: 'add',
        path: '../src/components/{{pascalCase name}}/types.ts',
        templateFile: 'templates/types.ts.hbs'
      }
    ]
  });
};
Templates
Index file (index.tsx.hbs):
import * as S from './style';
import {{pascalCase name}}Types from './types';


const {{pascalCase name}} = ({ title }: {{pascalCase name}}Types) => (
  <S.Container>
    <S.Title>{title}</S.Title>
  </S.Container>
);

export default {{pascalCase name}};
Style (style.ts.hbs):
import styled from 'styled-components';

export const Container = styled.main`
  width: 100%;
  height: 100%;
  display: flex;
  align-items: center;
  justify-content: center;
`;

export const Title = styled.h1`
  font-size: 4rem;
  padding: 2% 0;
`;
Test (test.tsx.hbs):
import { render, screen } from '@testing-library/react';

import {{pascalCase name}} from '.';

describe('<{{pascalCase name}} />', () => {
  const { container } = render(<{{pascalCase name}} />);

  it('should title be the component name', () => {
    expect(screen.getByRole('heading', { name: /{{pascalCase name}}/i }));
  });

  it('should snapshot', () => {
    expect(container.firstChild).toMatchSnapshot();
  });
});
Types (types.ts.hbs):
export default interface {{pascalCase name}}Types{
    title?: string
};
And the storybook file (stories.tsx.hbs):
import { Meta, Story } from '@storybook/react';
import {{pascalCase name}} from '.';

export default {
  title: '{{pascalCase name}}',
  component: {{pascalCase name}},
  args: {
    title: '{{pascalCase name}}'
  }
} as Meta;

export const Basic: Story = (args) => <{{pascalCase name}} {...args} />;
Now, we run the script and … “voilà”! React component successfully created.
Scenario 2: Back End - Controllers and Models
In the example bellow i'm using node.js, mongoose and express
This scenario is different, we are working on back-end side and we need to create controllers and models about a new collection on Mongodb.
Plop file become like this:
module.exports = function (plop) {
    // controller generator
    plop.setGenerator('component', {
      description: 'application controller logic',
      prompts: [
        {
          type: 'input',
          name: 'model',
          message: 'Model name: '
        }
      ],
      actions: [
        {
          type: 'add',
          path: '../models/{{pascalCase model}}.js',
          templateFile: 'templates/model.js.hbs'
        },
        {
          type: 'add',
          path: '../controllers/{{lowerCase model}}.js',
          templateFile: 'templates/controller.js.hbs'
        }
      ]
    });
  };
Model template:
const mongoose = require('mongoose');
const schema = new mongoose.Schema({
    key: String,
});
const {{pascalCase model}} = new mongoose.model('{{pascalCase model}}', schema);
module.exports = {{pascalCase model}};
Controller:
const {{pascalCase model}}Model = require("../model/{{lowerCase model}}");

// Create
const create{{pascalCase model}} = async (req, res) => {
    const {{lowerCase model}} = new {{pascalCase model}}Model({})

    await {{lowerCase model}}.save();
};

// Find all
const findAll{{pascalCase model}} = async (req, res) => {
    try {
        const {{lowerCase model}} = await {{pascalCase model}}Model.find();
        res.status(200).json({{lowerCase model}});
    } catch (err) {
        res.status(404).json({message: error.message});
    }
}

// Find One
const findOne{{pascalCase model}} = async (req, res) => {
    try {
        const {{lowerCase model}} = await {{pascalCase model}}Model.findById(req.params.id);
        res.status(200).json({{lowerCase model}});
    } catch (err) {
        res.status(404).json({message: error.message});
    }
}

// Update
const update{{pascalCase model}} = async (req, res) => {
    if(!req.body) {
        res.status(400).send({
            message: "Data can not be empty!"
        });
    }

    const id = req.params.id;

    await {{pascalCase model}}Model.findByIdAndUpdate(id, req.body, { useFindAndModify: false }).then(data => {
        if (!data) {
            res.status(404).send({
                message: `User not found.`
            });
        }else{
            res.send({ message: "User updated successfully." })
        }
    }).catch(err => {
        res.status(500).send({
            message: err.message
        });
    });
}

// Delete
const delete{{pascalCase model}} = async (req, res) => {
    await {{pascalCase model}}Model.findByIdAndRemove(req.params.id).then(data => {
        res.status(200);
    }).catch(err => {
        res.status(500).send({
          message: err.message
        });
    });
};

module.exports = {
    create{{pascalCase model}},
    findAll{{pascalCase model}},
    findOne{{pascalCase model}},
    update{{pascalCase model}},
    delete{{pascalCase model}}
}
Now we run the script! i'm going to create the 'User' model as example. After run the script the files going to be created!!
/models/user.js
const mongoose = require('mongoose');
const schema = new mongoose.Schema({
    key: String,
});
const User = new mongoose.model('User', schema);
module.exports = User;
/controllers/user.js
const UserModel = require("../model/user");

// Create
const createUser = async (req, res) => {
    const user = new UserModel({})

    await user.save();
};

// Find all
const findAllUser = async (req, res) => {
    try {
        const user = await UserModel.find();
        res.status(200).json(user);
    } catch (err) {
        res.status(404).json({message: error.message});
    }
}

// Find One
const findOneUser = async (req, res) => {
    try {
        const user = await UserModel.findById(req.params.id);
        res.status(200).json(user);
    } catch (err) {
        res.status(404).json({message: error.message});
    }
}

// Update
const updateUser = async (req, res) => {
    if(!req.body) {
        res.status(400).send({
            message: "Data can not be empty!"
        });
    }

    const id = req.params.id;

    await UserModel.findByIdAndUpdate(id, req.body, { useFindAndModify: false }).then(data => {
        if (!data) {
            res.status(404).send({
                message: `User not found.`
            });
        }else{
            res.send({ message: "User updated successfully." })
        }
    }).catch(err => {
        res.status(500).send({
            message: err.message
        });
    });
}

// Delete
const deleteUser = async (req, res) => {
    await UserModel.findByIdAndRemove(req.params.id).then(data => {
        res.status(200);
    }).catch(err => {
        res.status(500).send({
          message: err.message
        });
    });
};

module.exports = {
    createUser,
    findAllUser,
    findOneUser,
    updateUser,
    deleteUser
}
It makes our work so much faster, avoiding us to do this tiring things :) Here is the plop.js documentation, where you can checkout other actions, like ‘addMany’ or ‘append’: plopjs.com/documentation
I hope you enjoyed it and take this into your everyday life!! Thanks for reading guys. Comment if you have any feedback about it or suggestion of articles.
Cover image font: treinaweb.com.br/blog/plop-js-automatize-a-..